How To Customize The WooCommerce Checkout Page

The most effective method to tweak WooCommerce checkout Page – A Helpful aide
Checkout Pages needs your exceptional consideration in the event that you like to give a powerful shopping experience to your clients. In this helpful aide, you’ll figure out how you can modify the WooCommerce checkout page, make custom fields and rework or erase fields.
The default WooCommerce checkout page accompanies restricted checkout page choices. There is no help to rework or erase any custom field. Additionally, you can’t customize the checkout page.
Keeping in view your business necessities, we have made a far reaching manual for assist you with figuring out the best answer for redo the checkout page.
There are various ways of modifying a WooCommerce checkout page; some of them are utilizing WooCommerce expansions and custom coding, or you can utilize any outsider WooCommerce checkout module.
In this aide, we have utilized the WooCommerce Checkout field proofreader and director module to show you how you can add/eliminate or customize any custom field according to your business prerequisites.
The WooCommerce Checkout field proofreader and director module furnish a fantastic client experience with a powerful field customization choice to enhance your checkout field.
However, prior to plunging into the subtleties, we’ll provide you with a short outline of why adding custom checkout fields is significant for the improvement of your business.
Why do you need a custom WooCommerce Checkout?
You can boost the consistent shopping experience of your clients with a basic and quicker interaction to finish the checkout strategy.
The checkout pages fill in as a twofold asset to gather the client’s information.
Now and again, you should add or eliminate custom fields to make your checkout structure more exact.
For example, in the event that you are selling computerized items, there is no utilization of a location field or second location fields in your structure in light of the fact that these are unessential to the undertaking, and guests might think that it is befuddling.
Or on the other hand in the event that you are managing in a custom gems business, you could require a few additional fields so clients could give information that they like to imprint on the gems.
Along these lines, there are various reasons you should tweak your checkout page, alter, add, or erase a fields to get more transformations.
The simpler is the shopping experience your clients have with you; the more believed will turn into your image.
At last, the clients will get urged to purchase more from you.
Make it simpler to pick items for your clients
Research says individuals will generally purchase more assuming they go through a simpler method for finishing their shopping experience.
Most likely, the clients will leave any buy on the off chance that they need to go through a long and strong course of navigating various pages to finish their shopping.
They will just stop and leave for any contender online store.
That is where the genuine difficulty lies!
To conquer this issue, you need to concoct a basic and smooth client experience to support off their advantage in purchasing more by working on the checkout methodology. In the end, blissful clients will return by purchasing more items.
Let your customers add multiple products to the shopping cart at ease
Assuming that your clients have the opportunity to add different item variations to the shopping basket on the double without changing to the single item pages, they will ultimately appreciate really shopping and request more items. In this way, urge your clients to purchase more by tweaking your checkout page by allowing them to add various items quiet.
Offer a secure checkout payment gateway at checkout
At the point when the clients have the confidence that their contact and charging data is no problem at all, they will entrust more and purchase with the confirmation that their own data is in a protected hand. Thus, consistently offer a protected checkout installment door to convey an incredible shopping experience.
Presently, when you are know all about the significance of WooCommerce checkout page customization, now is the ideal time to continue on and investigate how this interaction continues and how you can execute these strategies to your checkout page.
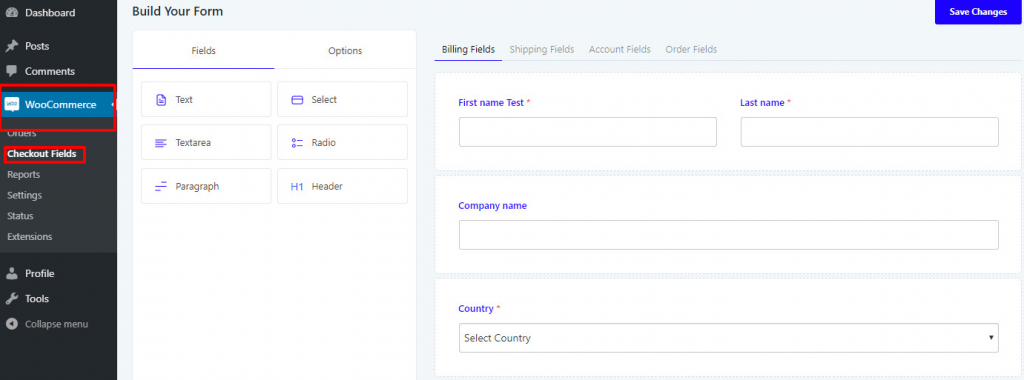
How to customize your checkout page using Checkout Manager Plugin
To simplify the system and obvious, we have introduced the WooCommerce Checkout Field Supervisor and Chief module, which gives powerful altering of checkout fields effortlessly.
Yet, before we go any further, l might want to introduce you with the checkout recorded supervisor and chief module and how ponders could it at any point treat your checkout page customization.
In this way, how about we get down to it.
WooCommerce Checkout Field Editor and Manager Plugin
You can boost the consistent shopping experience of your clients with a basic and quicker interaction to finish the checkout strategy.
The checkout pages fill in as a twofold asset to gather the client’s information.
Now and again, you should add or eliminate custom fields to make your checkout structure more exact.
For example, in the event that you are selling computerized items, there is no utilization of a location field or second location fields in your structure in light of the fact that these are unessential to the undertaking, and guests might think that it is befuddling.
Or on the other hand in the event that you are managing in a custom gems business, you could require a few additional fields so clients could give information that they like to imprint on the gems.
Along these lines, there are various reasons you should tweak your checkout page, alter, add, or erase a fields to get more transformations.
The simpler is the shopping experience your clients have with you; the more believed will turn into your image.
At last, the clients will get urged to purchase more from you.
Make it simpler to pick items for your clients
Research says individuals will generally purchase more assuming they go through a simpler method for finishing their shopping experience.
Most likely, the clients will leave any buy on the off chance that they need to go through a long and strong course of navigating various pages to finish their shopping.
They will just stop and leave for any contender online store.
That is where the genuine difficulty lies!
To conquer this issue, you need to concoct a basic and smooth client experience to support off their advantage in purchasing more by working on the checkout methodology. In the end, blissful clients will return by purchasing more items.
Robust Drop-Drown Form Builder
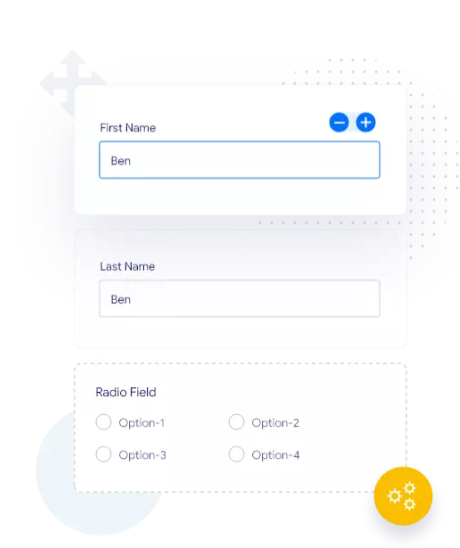
With the Checkout Field Editor you will get the opportunity to deal with the entirety of your fields. The strong dropdown form builder can immediately set your fields in your ideal request, or you can improve the current fields in your favored mode. Adding new fields or re-situating existing fields should be in every way possible in a breeze.
One-click Field Edit window
Each field has its setting area where you will get the general, advanced, and conditional option of that particular field. So, when you click on the “Options” tab, an edit option of that field will pop-up at the side of the window where you can easily edit its features.
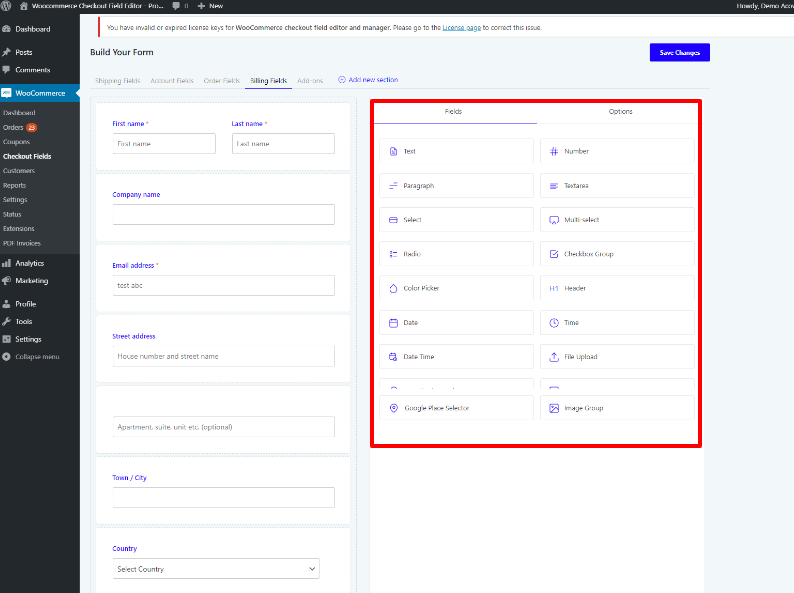
List of fields supported by Checkout field editor
At the point when you begin altering your checkout form, a rundown of custom structure fields should be visible on the right half of the altering segment, where the upheld fields are all noticeable. You can pick any of these fields and drag’n drop in your expected position. Here is the rundown of the supported fields.
Edit Default and newly added fields
You can alter any current default fields with Checkout Field Editor plugin, for example, first and last name fields, yet just restricted altering is took into account the default fields. You can alter these default fields yet can’t erase them out and out; nonetheless, in the event that you are not keen on showing these fields, you can just disable them.
The recently added fields accompany full power to edit, you can without much of a stretch edit, disable/enable them or even erase them on the off chance that not needed.
Conditional Logic supported field
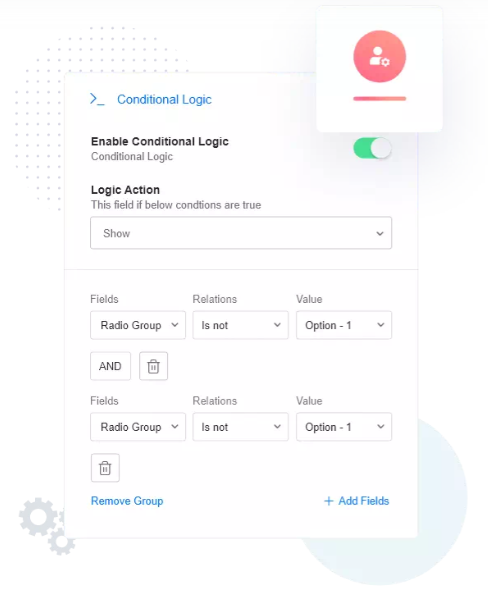
Conditional Logic is a brilliant element that makes a deception of short structure since individuals take off from finishing up lengthy forms. Thus, with conditional Logic, you can conceal your fields adroitly, and these will be apparent just when your client makes specific moves or satisfy specific circumstances or gathering of conditions you made. Consider it as making conditional branching, where certain fields will show up or conceal in view of the conditions you set. These conditional logic fields and segments can be added to the cart, client job, and cart subtotal and at cart all out.
Add new checkout fields on checkout forms
The excellent component of this checkout Field manager module is to give you a speedy set answer for add more useful fields pertinent to your business. In this way, you could sort out what explicitly your clients need from you. As I have referenced before, in the event that you are maintaining a gems business with tweaked gems choices, you should require a different field where the clients could add their notes connected with their custom gems request, which they need to etch on their adornments.
Or on the other hand, in the event that you are offering redid gifts administrations, you can add a different field where the clients could add on the off chance that they need any gift wrapping or not or on the other hand in the event that they need a particular tone or strip wrapping. You can put in however many fields as you like to add utilizing this amazing checkout field supervisor module.
Add new checkout fields on checkout forms

The excellent component of this checkout Field manager module is to give you a speedy set answer for add more useful fields pertinent to your business. In this way, you could sort out what explicitly your clients need from you. As I have referenced before, in the event that you are maintaining a gems business with tweaked gems choices, you should require a different field where the clients could add their notes connected with their custom gems request, which they need to etch on their adornments.
Or on the other hand, in the event that you are offering redid gifts administrations, you can add a different field where the clients could add on the off chance that they need any gift wrapping or not or on the other hand in the event that they need a particular tone or strip wrapping. You can put in however many fields as you like to add utilizing this amazing checkout field supervisor plugin.
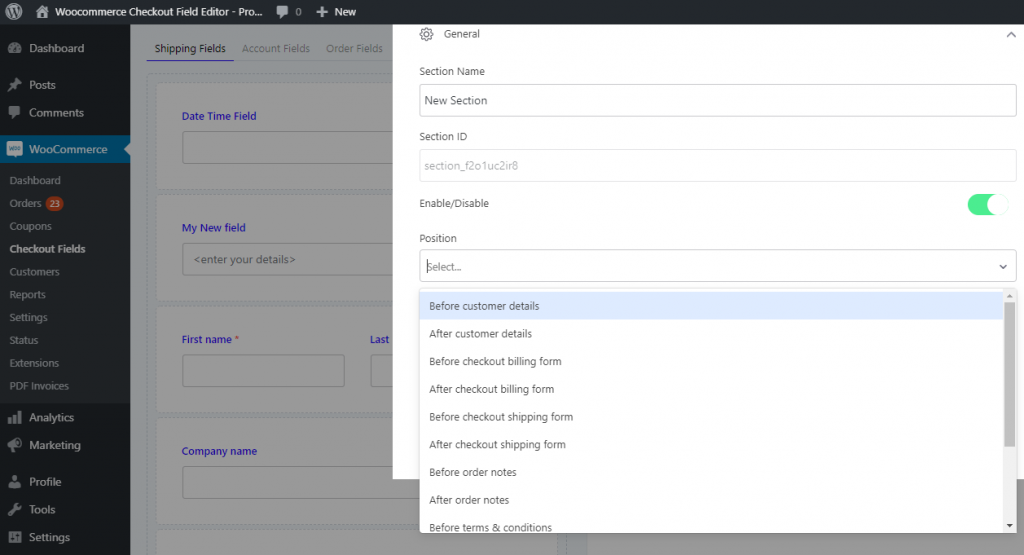
Add new sections
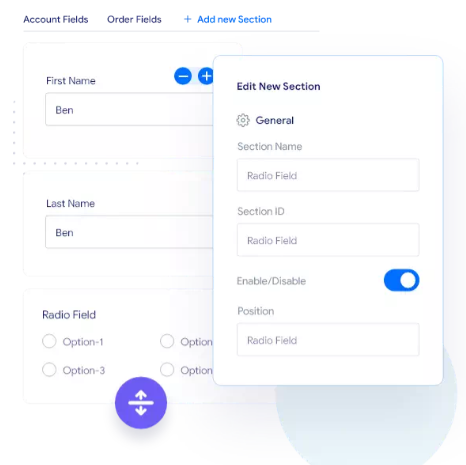
Other than adding fields, you can add new areas alongside the location and charging segment. Nonetheless, this is a genius highlight and just accessible with the expert variant.
Place sections in different areas
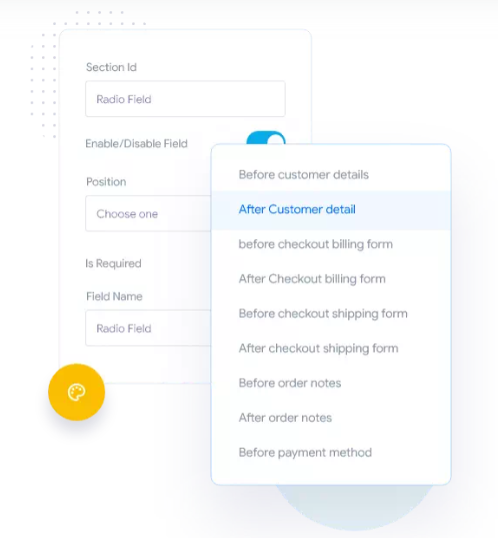
Here is one more fascinating element of this module that you not will undoubtedly put your segment at a particular put on your checkout page. You can put it at in excess of ten better places, for example, when client subtleties, after checkout charging structure or before request notes.
Re-order display of fields and sections
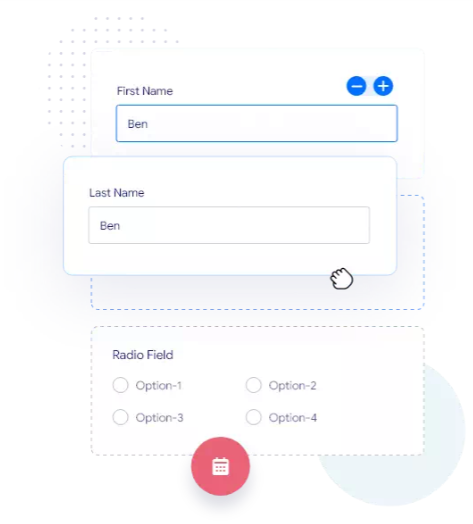
The fields can be shown in any request; you can move the fields in any ideal request in the backend. In like manner, the areas can be revised utilizing the alter window of that segment.
Enable/ Disable checkout fields and sections
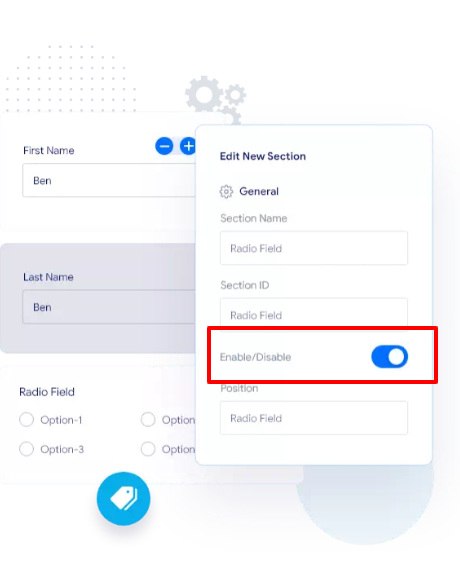
The Enable/ Disable feature lets you hide or display any field. The option is located at the edit window of each field.
One-click duplication of any field and section
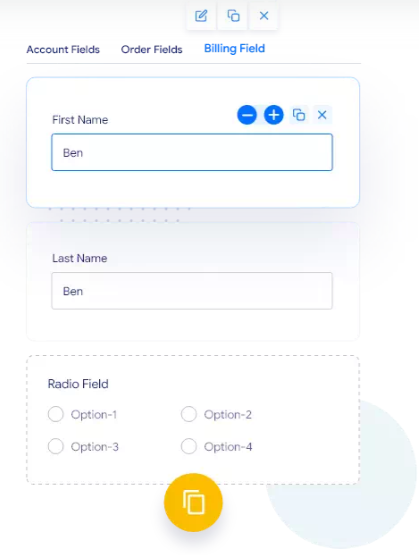
This efficient element will allow you to copy any part or field for your benefit. You can see a copy button choice on top of the field once you drift over the window.
Show/hide fields on the order detail page and order email
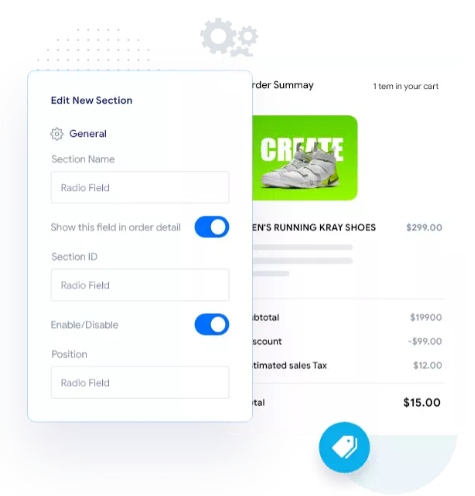
You will get an option to show or hide any field in the order details or order email. You can locate this option in the advanced tab of each field’s edit option.
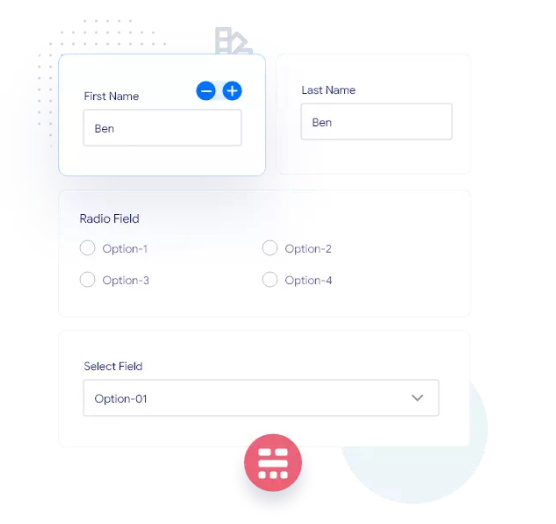
Adjust to show fields in two columns
You can change the presentation of your fields in two segments or change the field level or width on the checkout page. To tweak the width and level of your fields on the checkout page, you will find a choice when you drift over the field you need to change.
Presently, when you have acknowledged how utilitarian is the Checkout Field Manager plugin. What’s more, how much assistance with canning it be to set up a problem-free checkout page, we should continue toward my #1 segment where I will show you the commonsense part of utilizing the Checkout Field Editor Plugin.
How to customize checkout page using WooCommerce Checkout filed editor and manager plugin
First off, you will have to install WooCommerce checkout field Editor Plugin to get started.
Installation of WooCommerce checkout field Editor Plugin
Installation can easily be done while taking these steps;
- Go to Dashboard > plugin > Add New plugin
- Type in the search bar “Checkout Field Editor and Manager.”
- Click on the install and then activate it.
- You will find the plugin in the left menu bar under the WooCommerce tab in the Dashboard area
That is all you are finished with your establishment.
Presently, we will make a custom checkout structure page to test the functionalities. Where we will add/eliminate custom fields, add areas, and look at how things continue for all intents and purposes.
To investigate, you can exploit Backend Demo accessible on the wordpree.org.
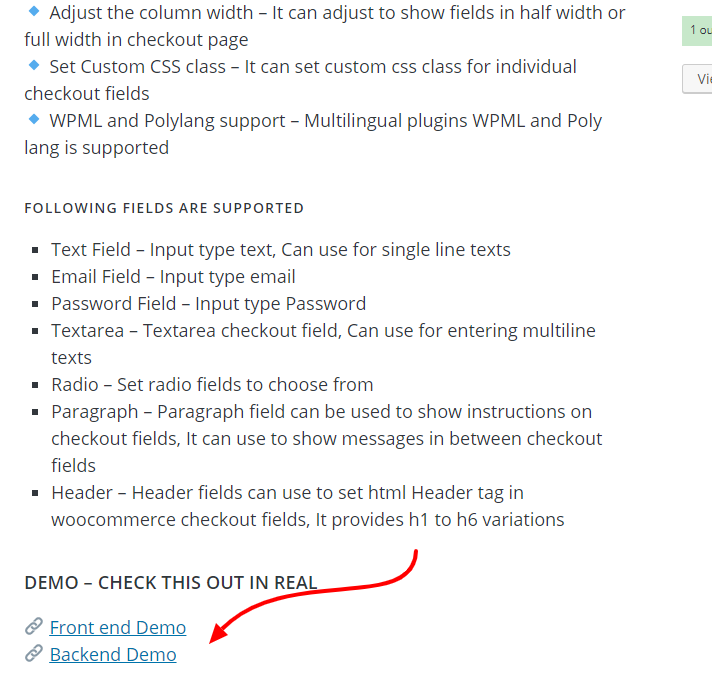
Once you click on the Backend Demo, you will enter into a demo site where you can test all the functionalities available in the free version.
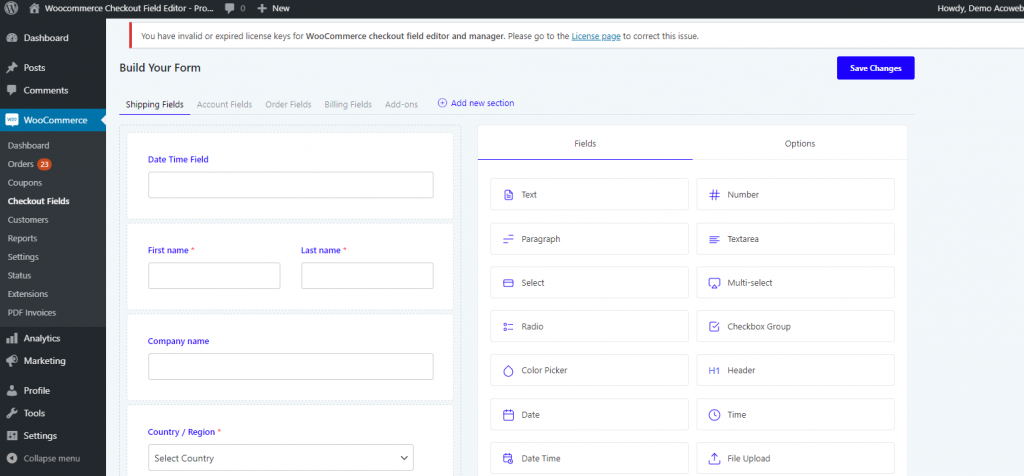
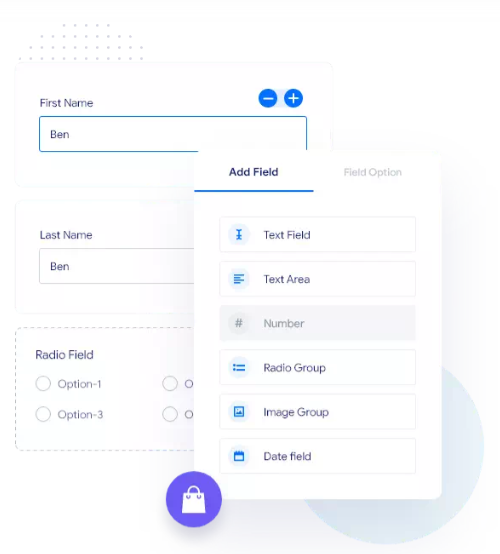
Add/remove the field in the checkout page
on the right side there are various fields accessible to be added. You can just drag’n drop any field from the right side segment in the checkout field structure on the left side.
I have added a text field in the structure, and when you float over the field, you will see the alter choices of that particular field. At the point when you click the alter choice, an alter window will spring up close by the structure. Presently, here you can alter every one of the settings connected with that field.
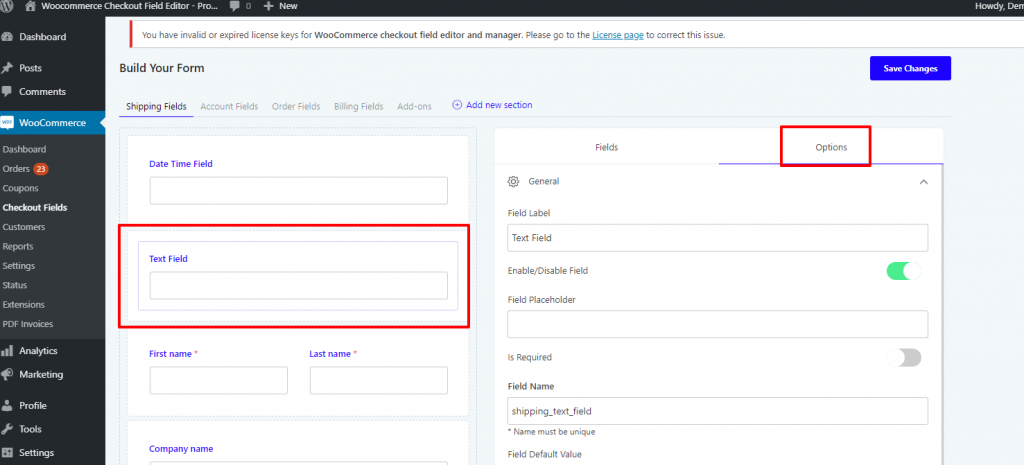
Here are the field options which can be edited.
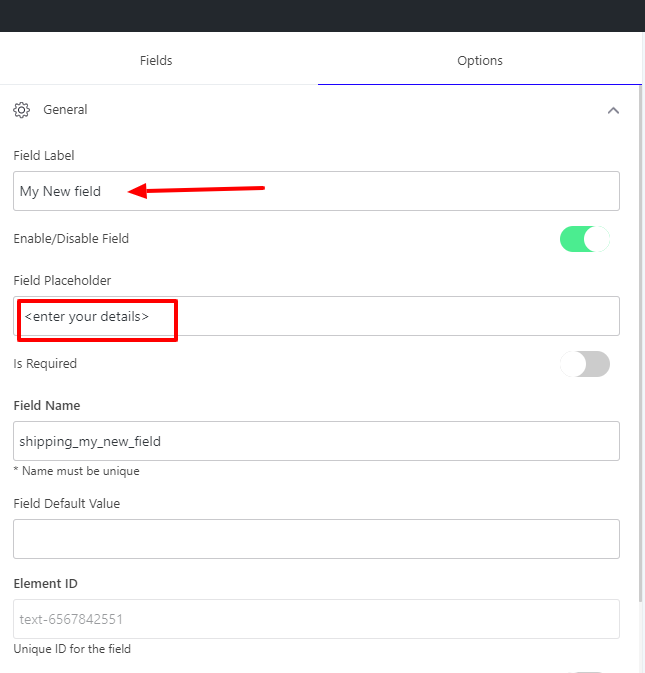
Name your field anything you like to, as I have added “my new field,” then, at that point, next, you can stow away or show this field with the Empower/debilitate choice beneath the field name.
In the field placeholder, you can enter any text where you believe that your client should add subtleties.
Then, at that point, the “is required” choice will make it an obligatory field to be filled by the client.
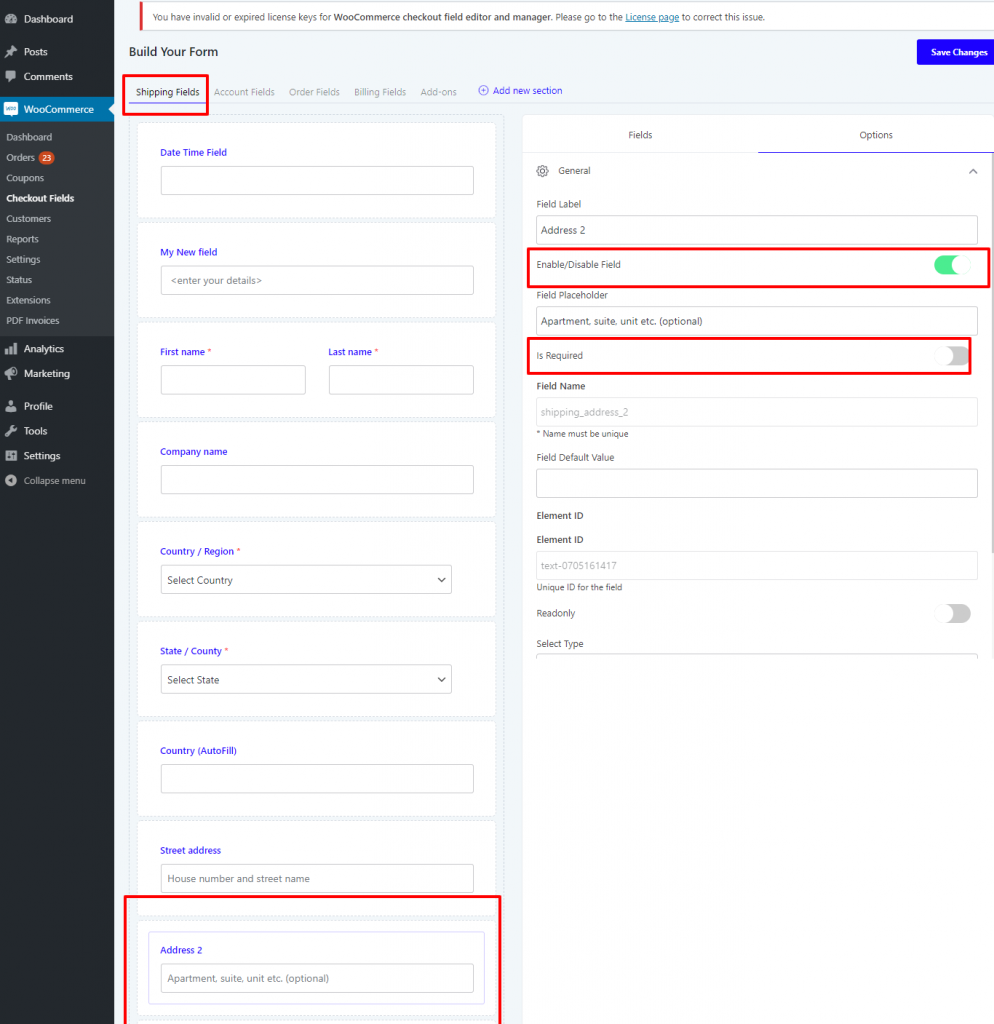
Shipping and billing address field editing
Frequently we require no delivery or charging address, so you can tap on the field and afterward click on the empower/debilitate choice. Additionally, you can conceal any remaining superfluous fields which are immaterial to your item. For example, on the off chance that you are selling computerized merchandise, there will be no requirement for any charging address, you can conceal this field by tapping on the empower/incapacitate choice.
How to show fields on the order detail page and email?
Assuming you like to show or conceal a few fields on the request detail page or in the email shipped off the client, you can do this by empowering a few choices in the high-level tab.
Click on the field you need to remember for the request detail page and afterward go to the high-level tab choices of that field and mark the “show this field in the request detail page” choice
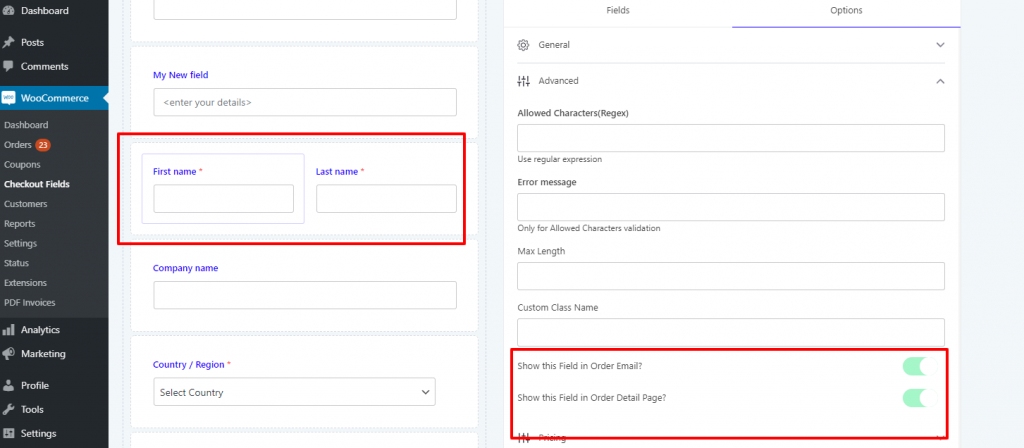
I need to incorporate the First name and last name field in the request detail structure and the email so when I click on the field alter choice, at the lower part of the choices segments, there is a high-level tab, where I have empowered “show this field all together email” and “show this field all together detail page.”
Add new sections and place them on ten different areas on the checkout page
You can add another part other than the general, delivery, and charging segments and spot them any place you like to add them. At the point when you drift over the additional part there, you will see alter choices. You can add the segment before the client’s subtleties or after client subtleties or some other suggested choice.
How to add conditional Logic
Suppose you like to add any conditional logic to any of your checkout form fields. You can easily access that option under the advanced tab in the edit option of each field.
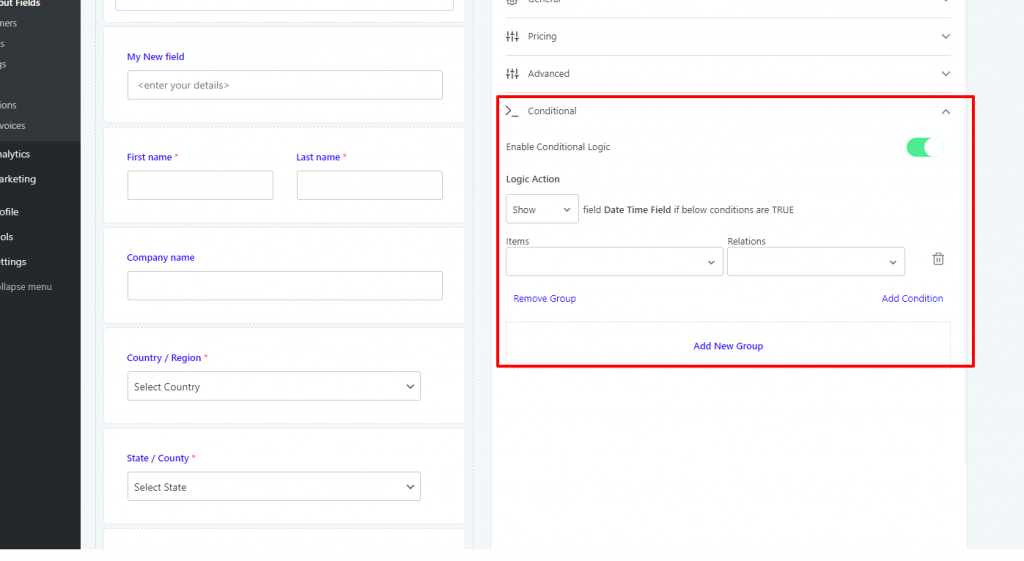
Here you can choose the field from the dropdown menu and afterward set the relations with that field that you need to make as a condition, and you are finished with adding restrictive rationale to your field.
Pricing options
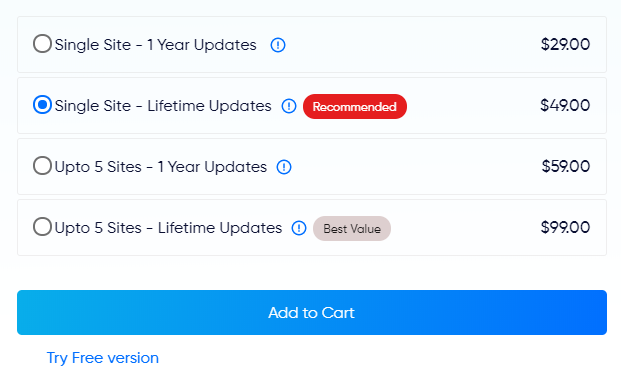
The WooCommerce checkout field manager is accessible with a free rendition and a star form. The genius variant has four levels with every one of the master highlights beginning at $29/year for a solitary site.
Final Verdict
In this way, here closes our instructional exercise, I want to believe that you got a superior image of how to tweak your checkout structure without any problem. I find the checkout Field proofreader’s most helpful and strong field supervisor with practically all fundamental elements one can find in an exceptional checkout module. In this way, I strongly suggest utilizing the checkout field supervisor module. Presently, it’s your move, do write in the remark segment, which element is thrilling and supportive to you. What’s more, would you say you will attempt this checkout module on your WordPress site or not?


Responses